
These days it often seems like everyone has a podcast. With so much competition and so many options for podcasting-centric equipment, it can be daunting to dive in headfirst without knowing the ropes. That’s where B&H comes in, with another all-encompassing guide to set you up for success and help you get your content off the ground as painlessly as possible. Let’s begin.
Why Make a Podcast?
The first topic couldn’t be simpler: Why even start a podcast? The answer is simple−because it’s the best way to get your content to the masses. Millions of people today are providing themselves with a viable income stream and an increased internet presence with a successful podcast, helping them to grow or develop their brand, creative voice, and recognition.

If you have something to say that you think people in the world would want to hear, or you simply want to get a foot in the entertainment industry in this increasingly digitized and interconnected age, the humble podcast serves as an ideal starting point. But don’t let that fool you into thinking that creating a successful podcast is a simple walk in the park. First, you’ll need to know what equipment you need to get your podcast off its feet. Enter: The master gear list.
Master Gear List
The first decision for any burgeoning podcast producer to make is choosing what microphone you want to work with. We can narrow our choices initially down to two categories: USB or XLR mic. With an XLR microphone, you get an analog device that converts your voice into electrical signals, but those signals need to be digitized to work with on your computer. That means buying an audio interface, which will simultaneously digitize your audio, boost the signal (with a microphone preamp), and let you control its monitoring and playback.
A plug-and-play USB mic will let you sidestep this need and plug directly into a computer. This is a great option if you are recording solo or don’t have space and budget for external gear like an interface. The downside, however, is that you will be limited in terms of growth or the recording of multiple people, as routing and mixing numerous USB mics can be troublesome. In this case, an audio interface with XLR mics is the preferred way to go, assuming recording a crowd is your goal.

You may also want to choose between dynamic and condenser mics, which offer different sound characteristics, as well as individual advantages and disadvantages with their performance. For a more in-depth guide to buying mics, check out our article “How to Choose a Microphone for Podcasting.”
Of course, recording to a computer isn’t the only option. Another popular option, especially for podcasters on the go, is recording to a mobile device. This can be something like a smartphone or tablet, as well as more robust, purpose-built products like a Zoom portable recorder.

With a smart device, you will have an advantage of easy use through an app and touchscreen, but the downside here is the need to use a special cable adapter, which will either limit you to one USB mic or lugging around an interface (assuming it’s compatible). A portable recorder will often have stereo mics built in, as well as audio inputs for plugging XLR mics directly in, but the downside to these ultraportable devices is a limited interface with which to work.
But believe it or not, your options don’t end there. Finally, you have all-in-one podcasting machines, such as those made by RODE and Zoom. These products combine a portable recorder and an interface into one, letting you record to the podcasting device, send audio to your computer, or do both at once. Plus, they come with the full-featured I/O expected of an interface, featuring multiple microphone preamp inputs, plenty of outputs for talent and monitoring, USB connections for computers, onboard audio processing, and much more.

Room treatment is next up, and while it might not be the sexiest topic in podcasting, it is certainly an important one. Since we live in a world where many of us are recording our podcasts in difficult recording environments, such as bedrooms, offices, and basements, rather than in pro studios, giving your space that studio-style isolation will go a long way in making your podcasts sound clean and professional.
This means buying things such as acoustic panels for your walls to reduce excessive reflections, and sound-isolating shields for your recording mic. A shield will do wonders for improving the quality of your podcast audio, but unlike acoustic panels, it won’t do much to improve the look of your podcast if you are streaming video content along with your audio.
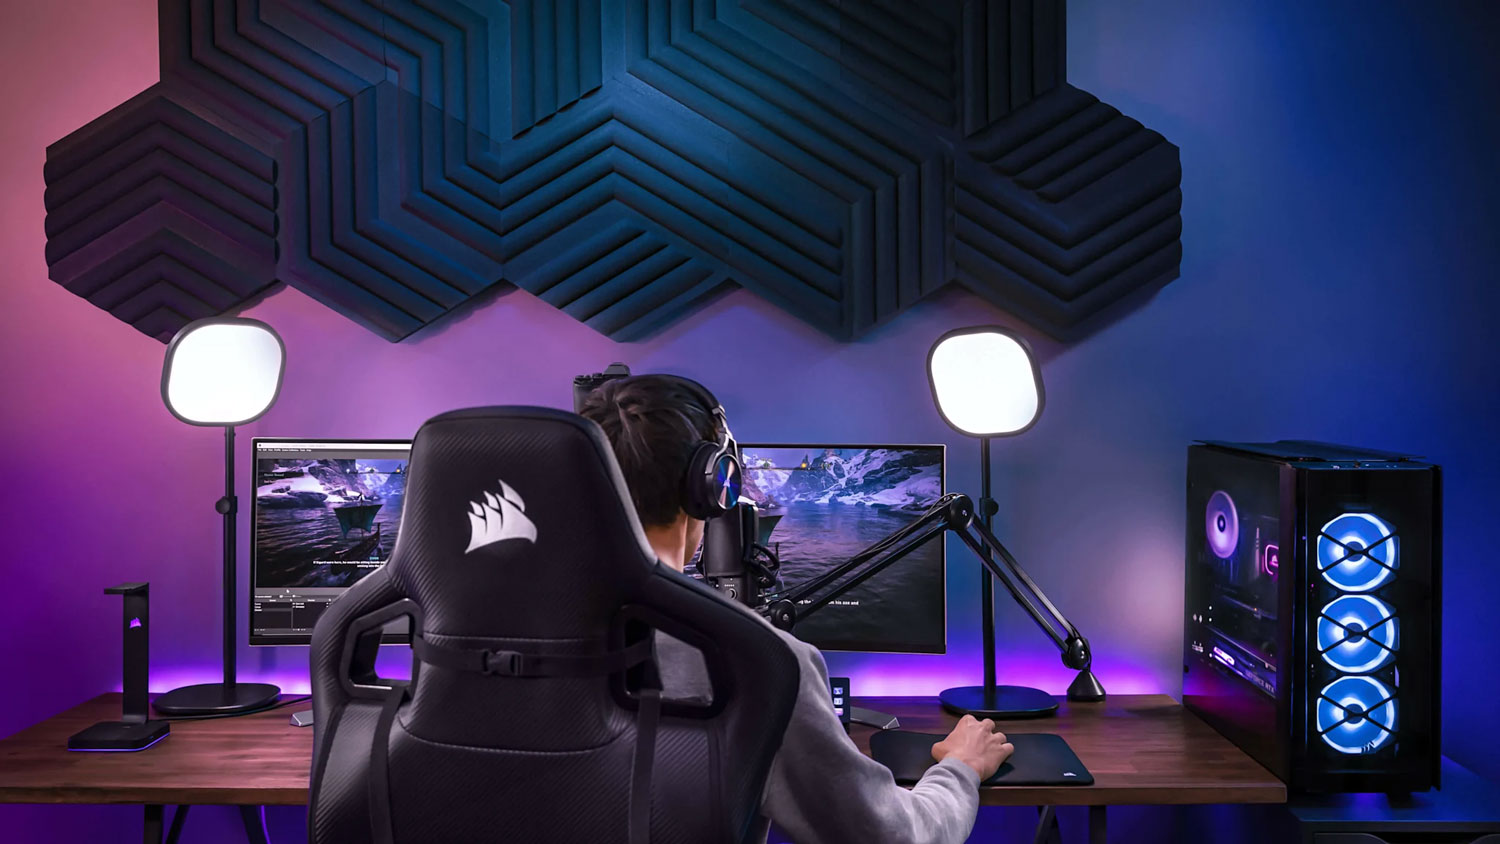
Finally, can’t forget accessories! It might seem like you can just grab a mic and get going, but you’ll find yourself struggling without the right mic stands, shockmounts, pop filters, headphones, and cables to get started. With a proper broadcast-style boom arm, you’ll find it much easier to position your mic on your work desk for optimal distance and comfort, not to mention direct compatibility with many common podcasting mics like the Shure SM7B.

Of course, you need to hear what you’ve recorded too, so you’ll need a decent pair of studio headphones to keep an ear on your work. Headphones with decent isolation are excellent for making sure your voice sounds right in your recordings, as well as avoiding any audio from your playback bleeding back into your mic, especially if you are recording close to your microphone.
A shockmount, such as the one that comes with the RODE NT1 5th generation, will ensure your podcast audio is free from rumbles caused by vibrations from your desk or recording space. A pop filter is a great choice to eliminate plosives caused by consonants like ‘P’s and ‘T’s. You’ll definitely want this to help keep your recordings clean and distortion free.

And lastly, don’t forget the cables. If you’re recording with a USB mic, be sure to grab the correct style of USB cable for your computer and microphone, which will commonly be a USB-C to USB-A cable or a dual-ended USB-C. If you’re recording with XLR mics, make sure you get a good quality XLR microphone cable that will last for years, reject noise, and provide enough slack for a tidy workspace.
Recording Tips
Here’s some good general recording advice: Don’t clip your input! The first rule of thumb for anyone new to audio recording is that when it comes to capturing sound, you want to record the strongest possible signal without ever letting it distort, which can occur when your volume becomes too high for your equipment and your waveform begins to flatten at the top.
Most mixers, audio interfaces, and DAW (recording software) graphical interfaces will provide you with a visual indicator in the form of a meter that will become red if your audio spikes into distortion territory at any point. This is a clear sign that your recording levels are too loud, and you should lower the gain on your input device, whether hardware or software. Usually, a good place to start with recording wise is somewhere around -3 to -1 dB. If you can record in this range without clipping your input, you will get a signal that you can still easily work with in post but will be strong enough to stand against the loudness of your competition.
If you’re recording with a dynamic mic, be sure to experiment with the distance between your voice and your mic to exploit the proximity effect and get the best sound. This refers to the tendency of dynamic microphones to pick up more bass frequencies the closer it gets to a sound source. This can be a great way to get a rich, booming vocal response from mics such as the Electro-Voice RE20 and Shure MV7+. For more information on recording techniques specifically for podcasting, head to our article here.

When it comes to selecting what software to use, the options are numerous, but also not especially varied. Any digital audio software that can record and edit multiple tracks at once is perfectly acceptable for use as a podcasting DAW. Whether you use free programs like Audacity and GarageBand or more professional (and expensive) software like Pro Tools, Logic Pro, and Cubase, the only practical difference for podcasters will ultimately be compatibility with plug-ins.

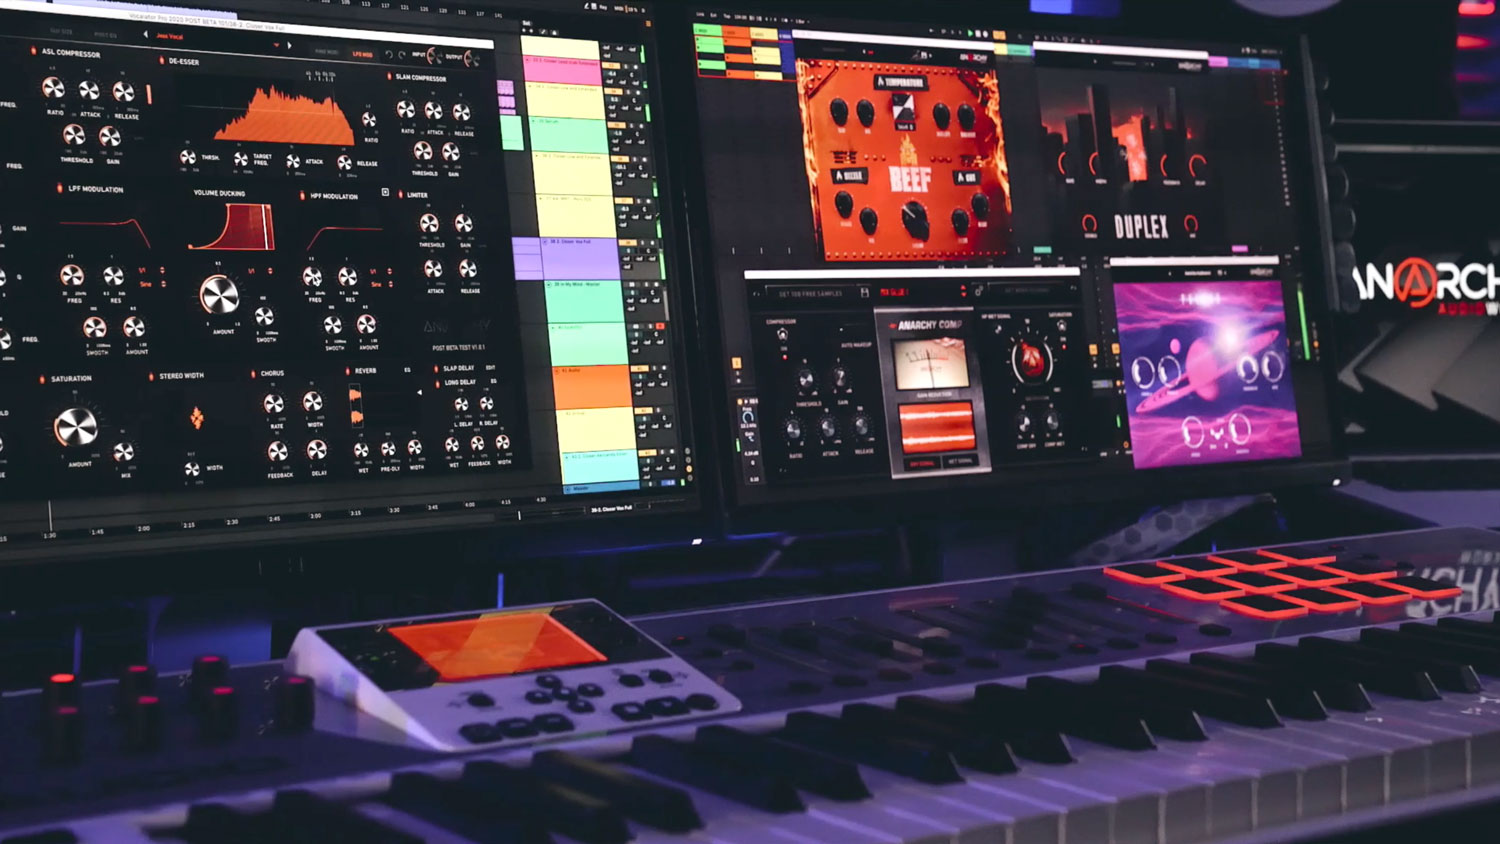
Plug-ins are special pieces of software typically designed to be inserted into an existing DAW to enhance their functionality with new or more sophisticated tools that process audio in various ways. If you are really serious about producing your podcasts with top-notch sound, sophisticated audio performances, and utilities for fixing nearly any audio issue that might crop up, then you’ll want a DAW that supports plug-in formats like VST, AU, and AAX.
Once you have the DAW, pick up plug-ins like de-essers (for sibilance), equalizers (for fine tuning audio) compressors (for more consistent dynamics), and noise gates (for clearer, noise-free audio). These tools will help you clean up your sound while simultaneously providing a pro-sounding sheen. Some great plug-in brands include Waves, Antares, Arturia, and Universal Audio.

Editing
Editing your podcasts is a very important part of the process, because it’s here that you will make your podcast sound as good as it can, while also trimming out unnecessary or unwanted bits that detract from your conversation flow. If you want people to tune in and stay tuned in to your podcast stream, you need to ensure your audio is free from artifacts and smooth sounding.
You want to start by cutting out any dead space or accidental sounds like mic bumps, belches, and the start and ending portion of your recording before the performance begins. Once you have the full audio track (or tracks) that you want to edit, it’s time to process your audio to make it sound better and more professional.
The previously mentioned plug-ins or similar audio processing tools will be indispensable for getting your audio that extra mile. Be sure to experiment with EQ to find where the best sounding frequencies of your voice lay. Compression will be ideal for bringing out quiet segments that might be hard to understand or hear while simultaneously taming loud spikes due to excessive dynamics, a classic trick used in broadcasting.
On the topic of dynamics, another handy tool is a limiter. This can be applied to your final output to make sure your recordings adhere to modern loudness standards. And to make sure that loudness is consistent throughout your podcast recording (without affecting dynamics), you should apply normalization, which will add constant gain throughout the audio to match your loudest peak, ensuring consistent volume.
Don’t forget to provide your productions with some music to spice things up. Nobody wants to listen to a voice and an empty room; you need to add some background music or sound FX to match the competition and make your content more entertaining. You can download music from numerous websites like (list), or if you are a musician, make your own for free. A great podcast should always have some music and sounds to pad the intro and outro of your podcast at a minimum. For a more detailed guide to editing podcasts, check out our article on that very subject.
Publishing
Once you have your podcast recorded and edited, it’s time to show the world. There are quite a few podcasting platforms on the web today, and the main factors to consider here are going to be what we’ll the two R’s: reach and revenue. On the one hand, you want to be able to reach the largest possible audience so you can gain as many new fans as possible. On the other hand, you also want to be able to make your podcast profitable by avoiding excessive subscription costs and earning revenue through monetization of your streams.
Some popular sites for hosting podcasts include Buzzsprout, PodBean, Captivate, and Simplecast. These sites will produce syndicated feeds for your podcasting content that can then be distributed to platforms for actual playback, such as YouTube, Spotify, iTunes, SoundCloud, and more. Think of it as the difference between a publisher and a distributor.

Most sites will offer free trials so that you can try them out and see which platform fits your style and needs the most. All podcast hosting websites will cost money, so it will come down to your budget and the reach they provide through their supported distribution to playback sites.
Since platforms like YouTube, iHeart Radio, iTunes, and Spotify have a vast reach through millions of daily users, choosing a service that can link to these sites will provide you with optimal opportunities for expanding your audience. YouTube not only has an enormous array of daily users but also makes it easy for you to monetize your podcasts through simplified advertising opportunities that can help provide some income until you manage to score your first sponsorship.
Final Thoughts
Well, we certainly covered a lot of topics here, but hopefully it gave you a solid foundation to start building your own successful podcasting career. Be sure to check out our other podcasting articles for a more detailed look at some of the steps involved. And as always, if you have any further questions, drop us a line below, and we’ll do our best to answer all your questions and comments.
